Shipping ◀︎
Support ◀︎
Contact ◀︎

Sag is always important, and often over looked. Incorrectly set sag not only effects the performance of the shock, but also the forks because the ride height in the rear changes how the weight of the bike is transferred to the forks. Rider sag is the measurement that should always be set; "free sag", or "static sag" is considered a "check" measurement to make sure the correct spring rate is installed. When your suspension was returned to you the correct rider sag measurement was listed in your paperwork, if you have any questions or concerns don't hesitate to contact us.
We recommend the use of two solid (preferably metal) points to measure from and to (shown as A and B in blue below).
We do not recommend measuring to the edge of the plastic fender or side plate, plastic flexes when the bike is lifted off the stand.
Ideally both these points (A and B) follow the arch of the swingarm as shown in red. Measuring too far outside this arch can result in the measurement being off by as much as 15mm.
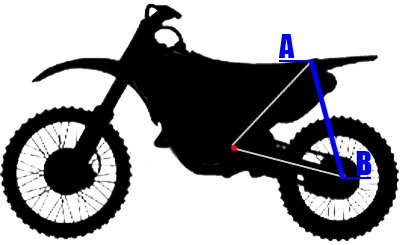
On most models under the rear fender there is a bolt within this arch that can be used as a good point A.
Measuring point B can be any square edge on the back of the swingarm.
If you are looking to determine the proper spring rate… please call Factory Connection and we will be glad to make a fork and shock spring recommendation based on your: Height, Weight, Bike make/model/year and the type of riding you do.